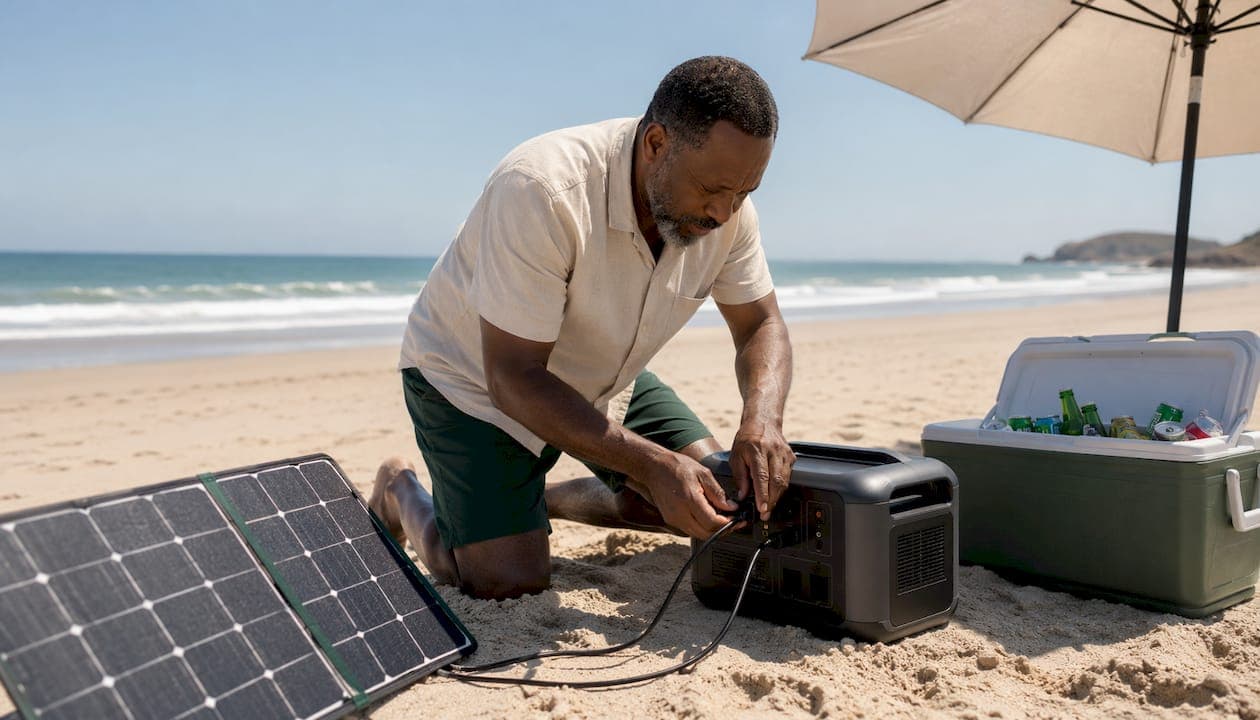
Charging a backup power station with solar panels comes down to four things: compatible equipment, correct connections, smart placement, and realistic expectations about output. Get those right, and you have a quiet, fuel-free energy source that works whether you're riding out a grid outage at home or running a campsite miles from the nearest outlet. Skip any one of them, and you'll either get no charge at all or risk damaging your station's internal charge controller.
Solar backup power stations accept direct current from solar panels through a dedicated solar input port, usually an MC4 or XT60 connector. The panels convert sunlight into DC electricity, which the station's built-in charge controller then regulates before storing it in the battery. Most modern portable stations handle this entire process internally, so you don't need a separate charge controller unless you're building a larger, more permanent off-grid solar setup.
How to charge a backup power station with solar panels: step-by-step
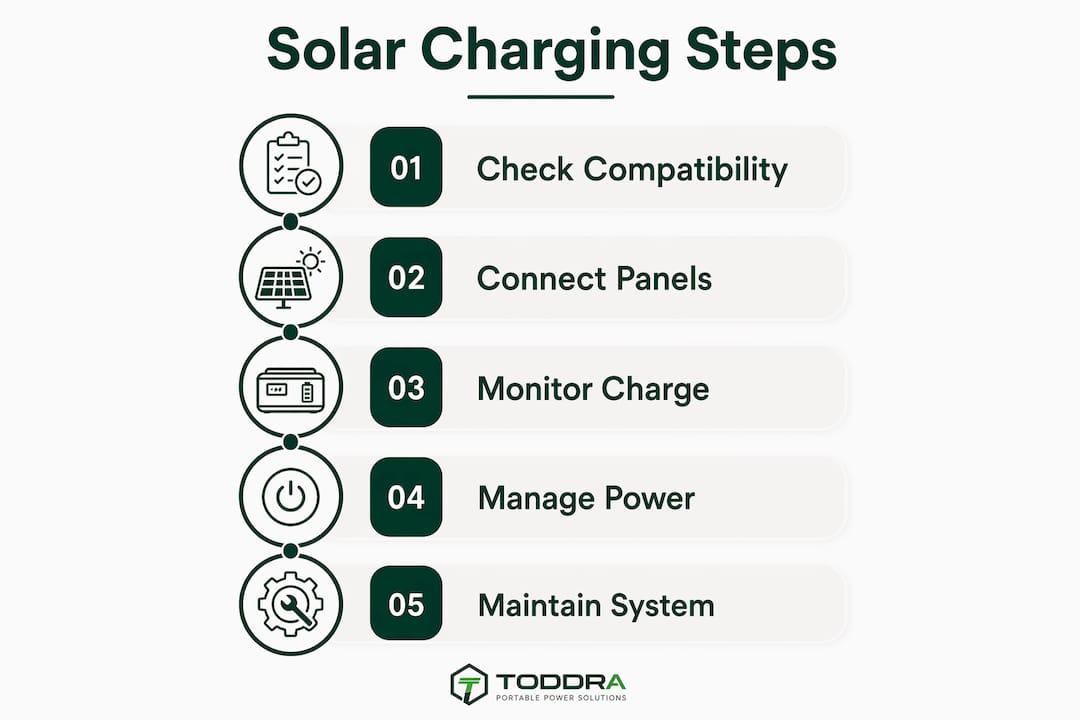
Before you connect anything, gather your equipment and run through a quick compatibility check. Rushing the connection is the single most common cause of damage.
What you need:
- A backup power station with a solar input port
- Compatible solar panels (wattage within the station's rated input range)
- MC4 to DC adapter or the connector type your station requires
- Extension cables if panels need to be placed farther from the station
- The manuals for both the panels and the station
Step-by-step process:
- Read both manuals. Confirm the station's maximum solar input voltage and current before connecting any panels.
- Position your solar panels facing the sun, ideally at a 30-degree tilt for best output.
- Check that the combined open-circuit voltage (Voc) of your panel array does not exceed the station's maximum input voltage.
- Connect the solar panels to the adapter cable, then plug the adapter into the station's solar input port.
- Power on the station and check the display for an incoming charge reading.
- Monitor the charge rate for the first few minutes to confirm the system is working within expected parameters.
- Keep panels clear of shade throughout the charging session.
Charge times vary widely by station capacity and panel wattage. A 1,000Wh station paired with a 200W panel array in good sunlight will typically take 5–6 hours to charge from near-empty. Add more panel wattage (within the station's rated limit) to cut that time.
Does your solar panel actually work with your backup station?
Compatibility is the most misunderstood part of solar charging, and getting it wrong can permanently damage your station. Every backup power station has three critical input limits: maximum open-circuit voltage (Voc), maximum input current (amps), and maximum input wattage. Exceeding any of these can destroy the internal charge controller.
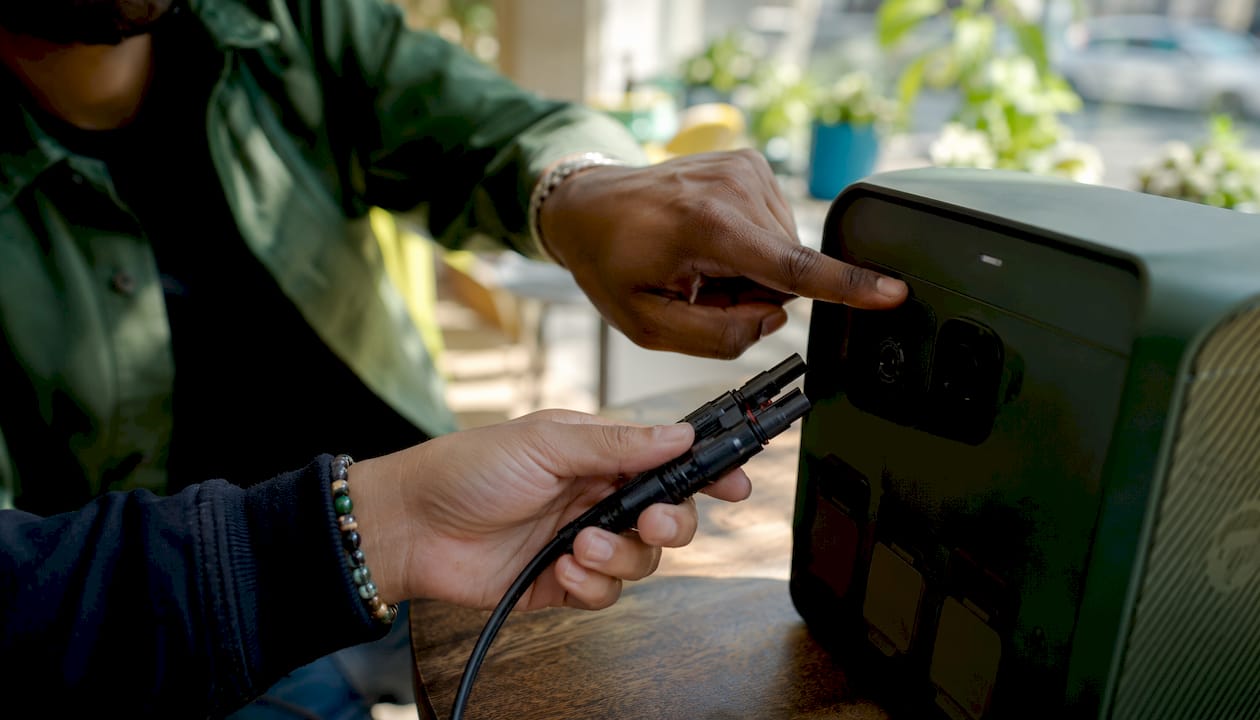
Open-circuit voltage is the voltage a panel produces when it's not connected to a load, and it runs higher than the panel's operating voltage. If you connect two 100W panels in series, their Voc values add together. That combined figure must stay below the station's maximum input voltage, which is listed in the manual or on the manufacturer's spec sheet.
MPPT vs. PWM charge controllers
The type of charge controller built into your station matters more than most buyers realize. MPPT (Maximum Power Point Tracking) controllers continuously adjust to extract the most power from your panels under changing light conditions. PWM (Pulse Width Modulation) controllers are simpler and less expensive, but they can't convert excess voltage into usable current the way MPPT units do. MPPT controllers outperform PWM especially when sunlight is variable, making them the better choice for most real-world conditions.
Most quality portable power stations sold today include MPPT controllers. If your station uses PWM, you'll want to keep panel voltage closer to the battery voltage to avoid wasting energy as heat.
Connector types to know:
- MC4: the standard outdoor solar connector; weatherproof and widely compatible
- XT60: common on portable stations; requires an MC4-to-XT60 adapter for most panels
- Anderson Powerpole: used on some larger stations and RV setups
- Proprietary connectors: some brands use their own plugs; always check before buying panels separately
Battery power stations are generally compatible with any brand of portable solar panels, so you can shop around for the best panel value without being locked into one ecosystem.
How to size your solar panels and battery capacity for real needs
The right system size depends on two numbers: how much energy you use daily, and how many days of backup you want. Start there, and the rest of the math follows.
Estimating your daily energy use:
- List every device you plan to power during an outage or off-grid trip
- Note each device's wattage (usually printed on the label or in the manual)
- Multiply wattage by hours of daily use to get watt-hours (Wh) per device
- Add all device totals for your daily consumption figure
A typical example: a refrigerator at 150W running 8 hours (1,200Wh), a few LED lights at 10W for 5 hours (50Wh), and phone charging at 20W for 2 hours (40Wh) adds up to roughly 1,290Wh per day.
Sizing your solar array:
Solar panels deliver only 60–75% of their rated power in real-world conditions due to heat, angle, and shading. Plan around that reduced output, not the label wattage. If you need to generate 1,290Wh per day and you have 5 peak sun hours, divide 1,290 by 5 to get 258W of ideal panel output. Apply the 60–75% real-world factor and you need roughly 350–430W of rated panel capacity to reliably hit that target.
| Daily energy need | Peak sun hours | Ideal panel output | Rated panel capacity needed |
|---|---|---|---|
| — | 5 hrs | 100W | — |
| 1,000Wh | 5 hrs | 200W | — |
| 1,— | 5 hrs | 300W | 400W |
| — | 5 hrs | 400W | — |
Key considerations when selecting equipment:
- Choose a battery capacity at least 20% larger than your daily consumption to avoid deep discharges
- LiFePO4 batteries tolerate more charge cycles and handle partial states of charge better than older lithium-ion chemistries
- Verify the station's maximum solar input wattage before buying panels; more panels than the station can accept adds no benefit
- For RV and camping use, foldable or flexible panels offer portability without sacrificing meaningful wattage
- Use NREL's PVWatts calculator to estimate actual solar production at your specific location
Setting up your solar charging system the right way
Physical setup determines how much of your panels' potential you actually capture. A well-placed 200W panel will consistently outperform a 300W panel mounted at the wrong angle in partial shade.
Wiring and connection steps:
- Lay out your panels in the chosen location before making any connections.
- Confirm all connectors are clean and undamaged.
- Connect panels in the configuration (series or parallel) that keeps combined voltage within the station's limits.
- Attach the appropriate adapter cable to the panel output.
- Run the cable to the station, keeping it as short as practical.
- Plug into the station's solar input port.
- Confirm a charge reading on the station's display before leaving the system unattended.
Placement best practices:
- Face panels true south in the Northern Hemisphere for maximum daily exposure
- A 30-degree tilt from horizontal captures the most energy across most of the United States
- Avoid any shadow from trees, roof edges, or nearby structures, even partial shade on one cell can cut output across the whole panel
- In summer, a slightly flatter angle (20–25 degrees) captures more midday sun; in winter, a steeper angle (45–50 degrees) compensates for the sun's lower arc
Pro Tip: Use the thickest gauge cable your connectors support for runs longer than 15 feet. Long, thin cables create voltage drop that quietly steals charging power without triggering any error on the station's display.
Extension cables let you place panels in full sun while keeping the station in a shaded, cooler spot. Cooler batteries charge more efficiently and last longer, so this is a worthwhile setup whenever the cable run is practical.

How to get the most out of solar charging in any weather
Sunlight is the variable you can't control, but you can manage how your system responds to it. Understanding what actually reduces output helps you plan around it rather than being caught off guard.
Shade on even a small part of a solar panel greatly reduces its power output. Full shade stops production entirely. This isn't a linear relationship: a shadow covering 10% of a panel's surface can cut output by 50% or more, depending on how the cells are wired internally. Panels with bypass diodes handle partial shading better than those without.
Temperature affects output too. Solar panels actually produce more power in cold, bright conditions than in hot summer weather. Most panels are rated at 25°C (77°F); output drops slightly for every degree above that. On a hot rooftop or dark pavement, a panel can run 20–30°C above ambient temperature, which meaningfully reduces what it delivers.
Practical ways to protect charging efficiency:
- Reposition panels every few hours to track the sun if you're stationary for a full day
- In overcast conditions, expect output to drop to roughly 10–25% of rated capacity; plan backup charging windows accordingly
- Keep panel surfaces clean; dust and bird droppings reduce output more than most people expect
- If you're using multiple panels, connect them in parallel rather than series when partial shading is likely; a shaded panel in a series string drags down the whole array
- Monitor the station's real-time input display and compare it against expected output to catch shading or connection issues early
Seasonal adjustments matter for anyone using solar backup at home year-round. Adjusting panel tilt twice a year (spring/summer and fall/winter) can recover meaningful daily output without any additional equipment.
Common mistakes that kill solar charging performance
Most solar charging problems trace back to a small set of avoidable errors. Knowing them in advance saves both frustration and potentially expensive repairs.
The most frequent pitfalls:
- Exceeding input voltage limits. Connecting panels in series without checking combined Voc against the station's maximum is the leading cause of charge controller failure. Always calculate before connecting.
- Wrong connector type. Plugging in an incompatible adapter can result in no charge, intermittent charging, or a loose connection that arcs and damages the port.
- Ignoring real-world output. Expecting a 400W panel to deliver 400W leads to undersized arrays and unexpectedly long recharge times. Plan for actual output near 90% in optimal conditions, and lower in typical conditions.
- Placing panels in partial shade. Even a thin shadow from a cable or antenna can cut output significantly.
- Using undersized cables. Thin cables on long runs create resistance that wastes energy as heat and can cause connectors to overheat.
- Not reading the manual. Each station has specific input requirements; what works for one model may damage another.
Troubleshooting steps when charging isn't working:
- Check the station's display for an input reading; zero watts usually means a connection or compatibility issue.
- Verify the panel Voc with a multimeter before connecting to the station.
- Inspect all connectors for bent pins, corrosion, or debris.
- Test each panel individually to isolate a faulty unit.
- Confirm the station's solar input port is selected (some stations require manual input source selection).
- Move panels to direct sunlight and recheck; low-light conditions can produce a reading too low to register.
Why solar backup systems build real energy resilience
The case for solar-charged backup power goes beyond convenience. Expandable battery systems paired with solar panels can sustain essential home appliances for days without refueling, with systems up to 40 kWh effectively maintaining HVAC, well pumps, and refrigeration. That kind of staying power changes what a power outage actually means for your household.
Fuel generators have a hard ceiling: they stop when the fuel runs out, and during extended outages, fuel can be difficult to find. A solar backup system recharges every day the sun rises. For homeowners in storm-prone regions or outdoor enthusiasts on multi-day trips, that daily recharge cycle is a meaningful advantage. You can read more about how solar backup compares to conventional generators for emergency energy supply in a range of real-world scenarios.
The technology has also matured quickly. LiFePO4 battery chemistry, now standard in quality portable stations, tolerates thousands of charge cycles without significant capacity loss. Paired with MPPT charge controllers and modern battery management systems, today's solar backup setups are more reliable and longer-lived than anything available five years ago.
How solar panels actually convert sunlight into stored power
Solar panels are made up of photovoltaic (PV) cells, typically silicon-based, that release electrons when photons from sunlight strike them. That electron movement creates direct current (DC) electricity. The more intense the light and the larger the panel surface, the more current the cells produce.
That DC output flows through the panel's output cables to the charge controller, which regulates voltage and current to match what the battery can safely accept. In a portable backup station, the charge controller is built in. It prevents overcharging, manages the charge curve (bulk, absorption, and float stages), and protects the battery from voltage spikes. Without it, unregulated solar current would damage or destroy the battery cells.
The battery stores that energy as chemical potential until you draw power from the station's AC or DC output ports. The station's inverter then converts DC battery power back to AC for standard household devices. This DC-to-storage-to-AC chain is why the efficiency of each component, panels, controller, battery, and inverter, compounds: losses at every stage add up, which is why real-world output is always lower than the sum of rated specs.
What equipment do you actually need for solar charging?
A reliable solar charging setup for a backup power station requires just a few core components, but quality in each one pays off over time.
Solar panels: Monocrystalline panels offer the best efficiency per square foot and perform better in low-light conditions than polycrystalline alternatives. For portable use, foldable monocrystalline panels in the 100W–400W range are the practical standard. Rigid panels mounted on an RV roof or fixed frame deliver more consistent output for stationary setups.
Charge controller: If your backup station has a built-in MPPT controller, you don't need a separate one. For larger DIY systems where you're connecting panels to a standalone battery bank, a dedicated MPPT controller like those in the Victron Energy SmartSolar line gives you detailed monitoring and better efficiency than a basic PWM unit.
Cables and connectors: MC4 connectors are the outdoor standard for good reason: they're weatherproof, rated for high current, and lock securely. Use 10 AWG cable for runs up to about 20 feet; switch to 8 AWG for longer runs to keep voltage drop under control. Extension cables are widely available and let you position panels optimally without moving the station.
Adapters: Most portable stations use a proprietary DC input connector. You'll typically need an MC4-to-DC adapter specific to your station model. Check the manufacturer's accessory list before buying third-party cables. For campsite charging setups, a short adapter cable with the right connector on each end is all that stands between your panels and a full battery.
Safety precautions you should follow every time
Solar panels produce live DC voltage the moment sunlight hits them. There's no on/off switch that makes them safe to handle mid-connection. That's the most important safety fact to internalize before working with any solar setup.
Core safety practices:
- Cover panels with an opaque cloth or cardboard before making or breaking connections; this stops current flow while you work
- Never connect or disconnect panels from a station while the station is actively discharging a heavy load
- Keep all connectors dry; moisture in MC4 connectors causes arcing and corrosion
- Don't exceed the station's rated input voltage or current under any circumstances
- Store panels flat or secured when not in use; wind can turn an unsecured panel into a projectile
- Keep children and pets away from cable runs and connection points
For larger fixed installations, the International Code Council's electrical standards (available through iccsafe.org) govern safe wiring practices. Portable setups don't require permits, but the same principles of proper cable sizing, secure connections, and overcurrent protection apply.
Keeping your solar panels and backup station in good shape
A well-maintained solar setup lasts years longer than a neglected one. The good news is that maintenance is straightforward and takes very little time.
For solar panels:
- Wipe panels with a damp cloth every few weeks; dust and grime reduce output noticeably over time
- Inspect MC4 connectors and cables for cracking, corrosion, or UV damage at the start of each season
- Check that mounting hardware (if applicable) remains secure after high winds
- Store foldable panels in their case when not in use to protect the surface and hinges
For backup power stations:
- Avoid storing the battery at 0% or 100% for extended periods; a 30–80% state of charge is ideal for long-term storage
- Keep the station in a cool, dry location; heat accelerates battery degradation
- Run a full charge-discharge cycle every few months if the station sits unused for long stretches
- Keep the firmware updated if your station supports app-based management; manufacturers often push improvements to charging algorithms and battery protection
LiFePO4 batteries are particularly forgiving compared to older lithium-ion chemistries. They handle partial charging, occasional deep discharges, and temperature swings better, but they still benefit from the basic care above.
How to monitor charging status and battery health
Your backup station's display is your primary window into what the system is doing. Most modern stations show incoming solar wattage, current battery percentage, estimated time to full charge, and output load in real time. Get familiar with those numbers so you can spot problems quickly.
A healthy solar input reading should roughly match your expected output given current sunlight conditions. If you're running 200W of panels in bright sun and the display shows 40W of input, something is wrong: check for shade, a loose connector, or a Voc mismatch. Consistent low readings on sunny days often point to a partially shaded panel dragging down the array.
Battery health shows up over time rather than on a single reading. If your station's capacity seems to have dropped noticeably from when it was new, check whether the battery management system (BMS) reports any cell imbalance or fault codes. Many stations with app connectivity display cycle count and capacity retention data. For home circuit backup use, tracking this data helps you plan ahead for battery replacement before a critical outage catches you short.
Pro Tip: Run a full charge from solar followed by a full discharge to a known load once every few months. This gives you an accurate, real-world picture of your station's actual usable capacity versus its rated spec.
Managing power wisely when you're running off-grid
Getting the most out of a solar backup system during an outage or off-grid trip isn't just about generating enough power. It's about spending that power where it counts most.
Start by ranking your devices by priority. Medical equipment, refrigeration, and communication devices come first. Lighting is usually low-draw and easy to keep running. High-draw appliances like electric kettles, hair dryers, and space heaters consume battery capacity fast and should be used sparingly or avoided entirely during extended backup periods.
Time your heaviest loads to coincide with peak solar input. Running the refrigerator's compressor cycle, charging laptops, or running a fan during midday hours draws from incoming solar power rather than the battery, which extends how long your stored energy lasts into the evening. This simple habit can meaningfully extend your effective backup duration without adding any equipment.
For longer off-grid stays, the rooftop solar benefits that apply to commercial buildings translate directly to residential and portable setups: generating power on-site during peak hours reduces how hard you lean on stored reserves. Pair that with a load priority plan and you'll find that a well-sized solar backup system covers far more than most people expect before the battery needs a recharge.
Key Takeaways
Charging a backup power station with solar panels works reliably when you match panel output to the station's input limits, plan for 60–75% of rated panel capacity in real-world conditions, and keep panels in full, direct sunlight throughout the charging session.
| Point | Details |
|---|---|
| Check input limits first | Never exceed the station's maximum open-circuit voltage or input current; doing so damages the charge controller permanently. |
| Plan for real-world output | Solar panels deliver 60–75% of rated wattage in typical conditions; size your array around that figure, not the label. |
| MPPT beats PWM | MPPT charge controllers extract more power under variable sunlight and are worth prioritizing in any quality station. |
| Shade is the biggest efficiency killer | Even partial shade on one panel cell can cut output by half; placement in full sun matters more than panel brand. |
| Expandable storage extends resilience | Battery systems up to 40 kWh paired with solar can sustain essential appliances for days without any fuel. |
Power your home and adventures with Toddra
When you're ready to build a solar backup setup you can actually count on, Toddra carries carefully selected portable power stations and solar-compatible battery systems designed for both home backup and outdoor use. The Jackery Battery Pack 5000 Plus Expansion Battery offers 5,040Wh of expandable LiFePO4 storage, built to pair with solar charging for extended off-grid or emergency backup power. Explore the full range at Toddra and find the system that fits your energy needs, your space, and your peace of mind.