Why solar panels need a charge controller
Solar panels need a charge controller because they consistently output more voltage than your battery can safely accept. A standard "12V" solar panel typically produces 16 to 20 volts, while a 12V battery only needs around 14 to 14.5 volts to reach a full charge. Without a controller sitting between the two, that excess voltage flows straight into your battery, causing overheating, electrolyte loss, and permanent capacity damage.
The charge controller acts as the energy manager in your solar system, reading battery voltage in real time and adjusting incoming power to a safe level. It does far more than just cap voltage, though. Here is what it protects against:
- Overcharging: Excess voltage from the panel damages battery cells and shortens lifespan.
- Reverse current flow: At night, with no solar production, stored battery energy can flow backward into the panels without a controller blocking it, draining your battery and potentially damaging your wiring.
- Deep discharge: The Low Voltage Disconnect (LVD) feature cuts power to connected loads when the battery drops to a critically low voltage, preventing the kind of deep discharge that permanently reduces capacity.
- Voltage fluctuations: Solar output shifts constantly with temperature, cloud cover, and sun angle. The controller smooths those swings before they reach your battery.
A charge controller is essential whenever your solar panel output exceeds 2 watts per 50 amp-hours of battery capacity. Below that threshold, very small trickle-charge panels (typically 1 to 5 watts) may not require one. For virtually every practical off-grid setup, including RVs, cabins, boats, and home backup systems, a controller is not optional.
What does a solar charge controller actually do?
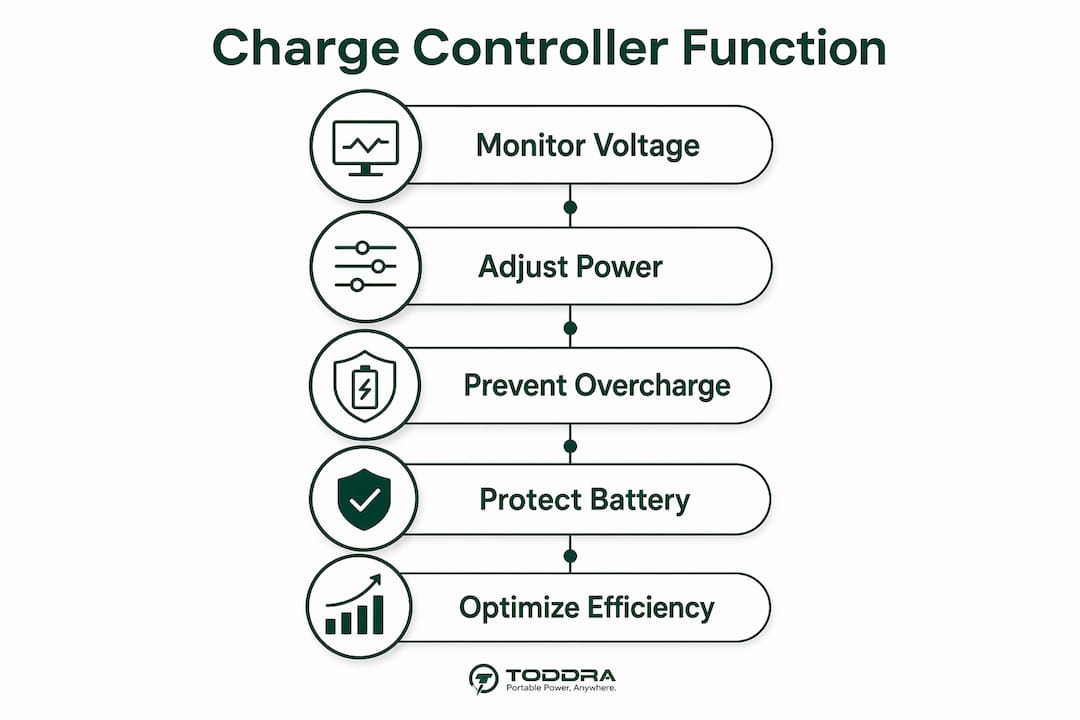
A solar charge controller is a voltage and current regulator that sits between your solar panels and your battery bank. Its job is to regulate voltage and current, prevent overcharging, stop reverse current flow, and protect the battery from deep discharge through LVD. Think of it as a gatekeeper that decides exactly how much power the battery receives at any given moment.
Here is a clear breakdown of its core functions:
- Overcharge prevention: The controller monitors battery voltage and reduces or stops incoming current once the battery reaches its maximum safe voltage, protecting cells from heat damage and electrolyte loss.
- Reverse current blocking: Using semiconductor switches or blocking diodes, the controller prevents reverse current from draining the battery back into the panels after dark.
- Low Voltage Disconnect (LVD): When battery voltage falls to a preset threshold (often around 11V for a 12V system), the controller disconnects DC loads automatically, then reconnects them once the battery has recharged to a safe level.
- Battery chemistry matching: The controller must be configured for your specific battery type. LiFePO4, AGM, gel, and flooded lead-acid batteries each require different charge voltage setpoints.
- System stability: By managing variable solar input, the controller keeps the battery cycling within healthy parameters, which directly extends its usable life.
Matching the controller to your battery voltage and chemistry is not a secondary concern. A controller set to lead-acid voltage profiles will undercharge or damage a LiFePO4 battery over time. Getting this right from the start protects your investment in both the battery and the panels.
How does a solar charge controller work?
The controller continuously reads your battery's voltage to determine its current state of charge, then adjusts the power flowing in from the panels accordingly. When the battery is low, the controller allows maximum current to flow. As the battery approaches full charge, the controller progressively reduces incoming current to avoid overvoltage.

Solar panel output is never perfectly stable. Temperature, shading, time of day, and cloud cover all cause the panel's voltage and current to shift constantly. A 12V panel might produce anywhere from 16 to 22 volts depending on conditions. The controller handles those swings so the battery never sees raw, unregulated power.
At night, when panels produce no voltage, the controller's diode or semiconductor switch closes the circuit in one direction only, blocking any backward current flow from battery to panel. Without this protection, a fully charged battery would slowly drain into the darkened panels overnight.
Pro Tip: Cover your solar panels or disconnect them before wiring your system. A panel in direct sunlight produces live voltage the moment it is exposed, which can arc or damage components during installation.
The conceptual energy flow through a controller works like this:
- Sunlight hits the panel and generates DC electricity.
- The controller reads the battery voltage to assess its state of charge.
- Incoming panel voltage is regulated down to the level the battery currently needs.
- Current flows into the battery at a safe, controlled rate.
- As the battery nears full charge, the controller reduces current to a maintenance level.
- At night or in very low light, the controller's blocking function prevents reverse current.
- If battery voltage drops too low under load, LVD disconnects the DC loads automatically.
Modern controllers use advanced charging algorithms that factor in battery type, ambient temperature, and real-time state of charge to maximize efficiency while keeping the battery safe. This dynamic adjustment is what separates a quality controller from a simple on/off switch.
PWM vs. MPPT: which type of controller fits your system?
Two main technologies dominate the solar charge controller market: Pulse Width Modulation (PWM) and Maximum Power Point Tracking (MPPT). They protect batteries in the same fundamental way but handle excess panel voltage very differently.

PWM controllers regulate voltage by rapidly switching the connection between panel and battery on and off, hundreds of times per second. This pulse action lowers the average voltage reaching the battery. The downside is that any voltage above what the battery needs is simply wasted as heat. PWM works best when your panel voltage closely matches your battery voltage, making it a practical choice for small 12V systems where the panel and battery are well matched.
MPPT controllers take a more sophisticated approach. Instead of discarding excess voltage, an MPPT controller converts it into additional current. So a panel producing 22 volts into a 12V battery system does not waste the extra 8 volts. The MPPT controller converts that voltage difference into usable amperage, delivering more total power to the battery. This makes MPPT the right choice for larger arrays, higher-voltage panels, 24V or 48V battery systems, longer cable runs, and cold climates where panel voltage naturally rises.
For a deeper look at how solar system output relates to panel and battery voltage matching, the voltage relationship between your array and battery bank is one of the most important factors in controller selection.
| Feature | PWM controller | MPPT controller |
|---|---|---|
| Efficiency | Around 70% | Above 90% |
| Best system size | Small (under 5W) | Medium to large (above 5W) |
| Panel/battery voltage | Must be closely matched | Handles mismatched voltages |
| Cold weather performance | Standard | Better (captures higher panel voltage) |
| Typical cost | Lower | Higher |
| Best use case | RVs, small DIY kits, basic 12V setups | Cabins, off-grid homes, 24V/48V systems |
- PWM controllers are widely available, simple to install, and cost-effective for straightforward small systems.
- MPPT controllers pay for themselves in larger systems by recovering power that PWM would waste, especially when using higher-voltage panels or running longer cable distances.
Common features that protect your battery and system
Modern solar charge controllers pack in several features beyond basic voltage regulation. Understanding these helps you choose a controller that genuinely fits your setup.
- Low Voltage Disconnect (LVD): Automatically disconnects DC loads when battery voltage falls to a preset threshold, preventing deep discharge damage. Most controllers allow you to adjust this setpoint to match your battery's recommended depth of discharge.
- Temperature compensation: Battery charging voltage needs to shift with temperature. A hot battery requires a lower charge voltage to avoid gassing; a cold battery needs a slightly higher voltage to charge fully. Controllers with temperature compensation adjust setpoints automatically, which is especially valuable in climates with wide seasonal swings.
- Load control terminals: Many controllers include dedicated DC load output terminals, letting you connect lights or small appliances directly. The controller manages these loads and disconnects them via LVD when the battery is low.
- Display and monitoring: LED indicators, LCD screens, and Bluetooth connectivity let you monitor battery voltage, charging current, and system status in real time. MPPT controllers often include more detailed displays given their higher price point.
- Reverse polarity protection: Wiring a controller with reversed polarity is a common mistake. Built-in protection prevents damage to the controller and battery if the cables are accidentally swapped.
- Overcurrent protection: Controllers use fault protection features such as internal fuses or circuit breakers to guard against wiring faults and unexpected current spikes.
These features work together to extend battery lifespan and keep the system running reliably with minimal hands-on maintenance. For anyone building a solar campsite setup or a permanent off-grid installation, a controller with LVD and temperature compensation is worth the modest extra cost.
Expert insights on configuration and battery health
Getting the controller installed and configured correctly matters as much as choosing the right model. Two setup details trip up more people than any other.
Connect the battery before the panels. Connecting the battery first allows the controller to detect system voltage and configure its internal parameters correctly. Connecting the panel first can prevent the controller from starting properly or identifying the battery voltage, leading to misconfiguration or component damage.
Set voltage setpoints for your battery chemistry. Experts consistently stress that configuring voltage setpoints based on battery chemistry often has more bearing on battery health than the regulation method itself. A LiFePO4 battery and a flooded lead-acid battery have different charge voltage profiles, absorption voltages, and float voltages. Running a LiFePO4 battery on lead-acid settings will either undercharge it or, worse, push it beyond its safe voltage ceiling.
MPPT controllers offer a particular advantage when your panels run at a higher voltage than your battery bank, or when cable runs are long. The controller's ability to convert excess voltage into current means less power is lost to wire resistance over distance, which matters in larger off-grid solar systems.
Controller sizing is another area where mistakes are costly. Overloading a charge controller beyond its amperage rating risks damage to both the controller and the wiring. A common industry practice is to size the controller for 125% of the solar array's maximum output current, giving headroom for bright-sky conditions when panels briefly exceed their rated output.
Pro Tip: Before connecting your solar array, calculate the maximum short-circuit current of your panels and multiply by 1.25. That figure is the minimum amperage rating your controller should carry.
For anyone building a reliable home backup system, Toddra carries the Jackery Battery Pack 5000 Plus, a 5,040Wh expansion battery designed for solar-compatible systems that demand safe, stable, and well-managed charging. Pairing quality storage with a properly sized charge controller is how you build a system that lasts.

Key Takeaways
A solar charge controller is the essential protective link between your solar panels and battery, regulating voltage and current to prevent overcharging, reverse current drain, and deep discharge damage.
| Point | Details |
|---|---|
| Panels output excess voltage | Most 12V panels produce voltages higher than the nominal battery voltage, making regulation necessary to prevent damage. |
| Controller needed above 2W/50Ah | A charge controller is required when panel output exceeds 2 watts per 50 amp-hours of battery capacity. |
| MPPT controllers can achieve high efficiencies substantially higher than PWM types. | MPPT controllers outperform PWM and suit larger arrays, higher-voltage panels, and cold climates. |
| Battery-first connection order | Always connect the battery to the controller before the panels to allow correct voltage detection. |
| Voltage setpoints protect battery health | Configuring setpoints for your battery chemistry (LiFePO4 vs. lead-acid) often matters more than the regulation method. |